Storage & Backup
How to Build a Simple Home Archive for Old Wearable Camera Photos
A practical, step-by-step home archive for old Narrative Clip exports and modern wearable-camera photos — workflow, folders, naming, and offsite copy.
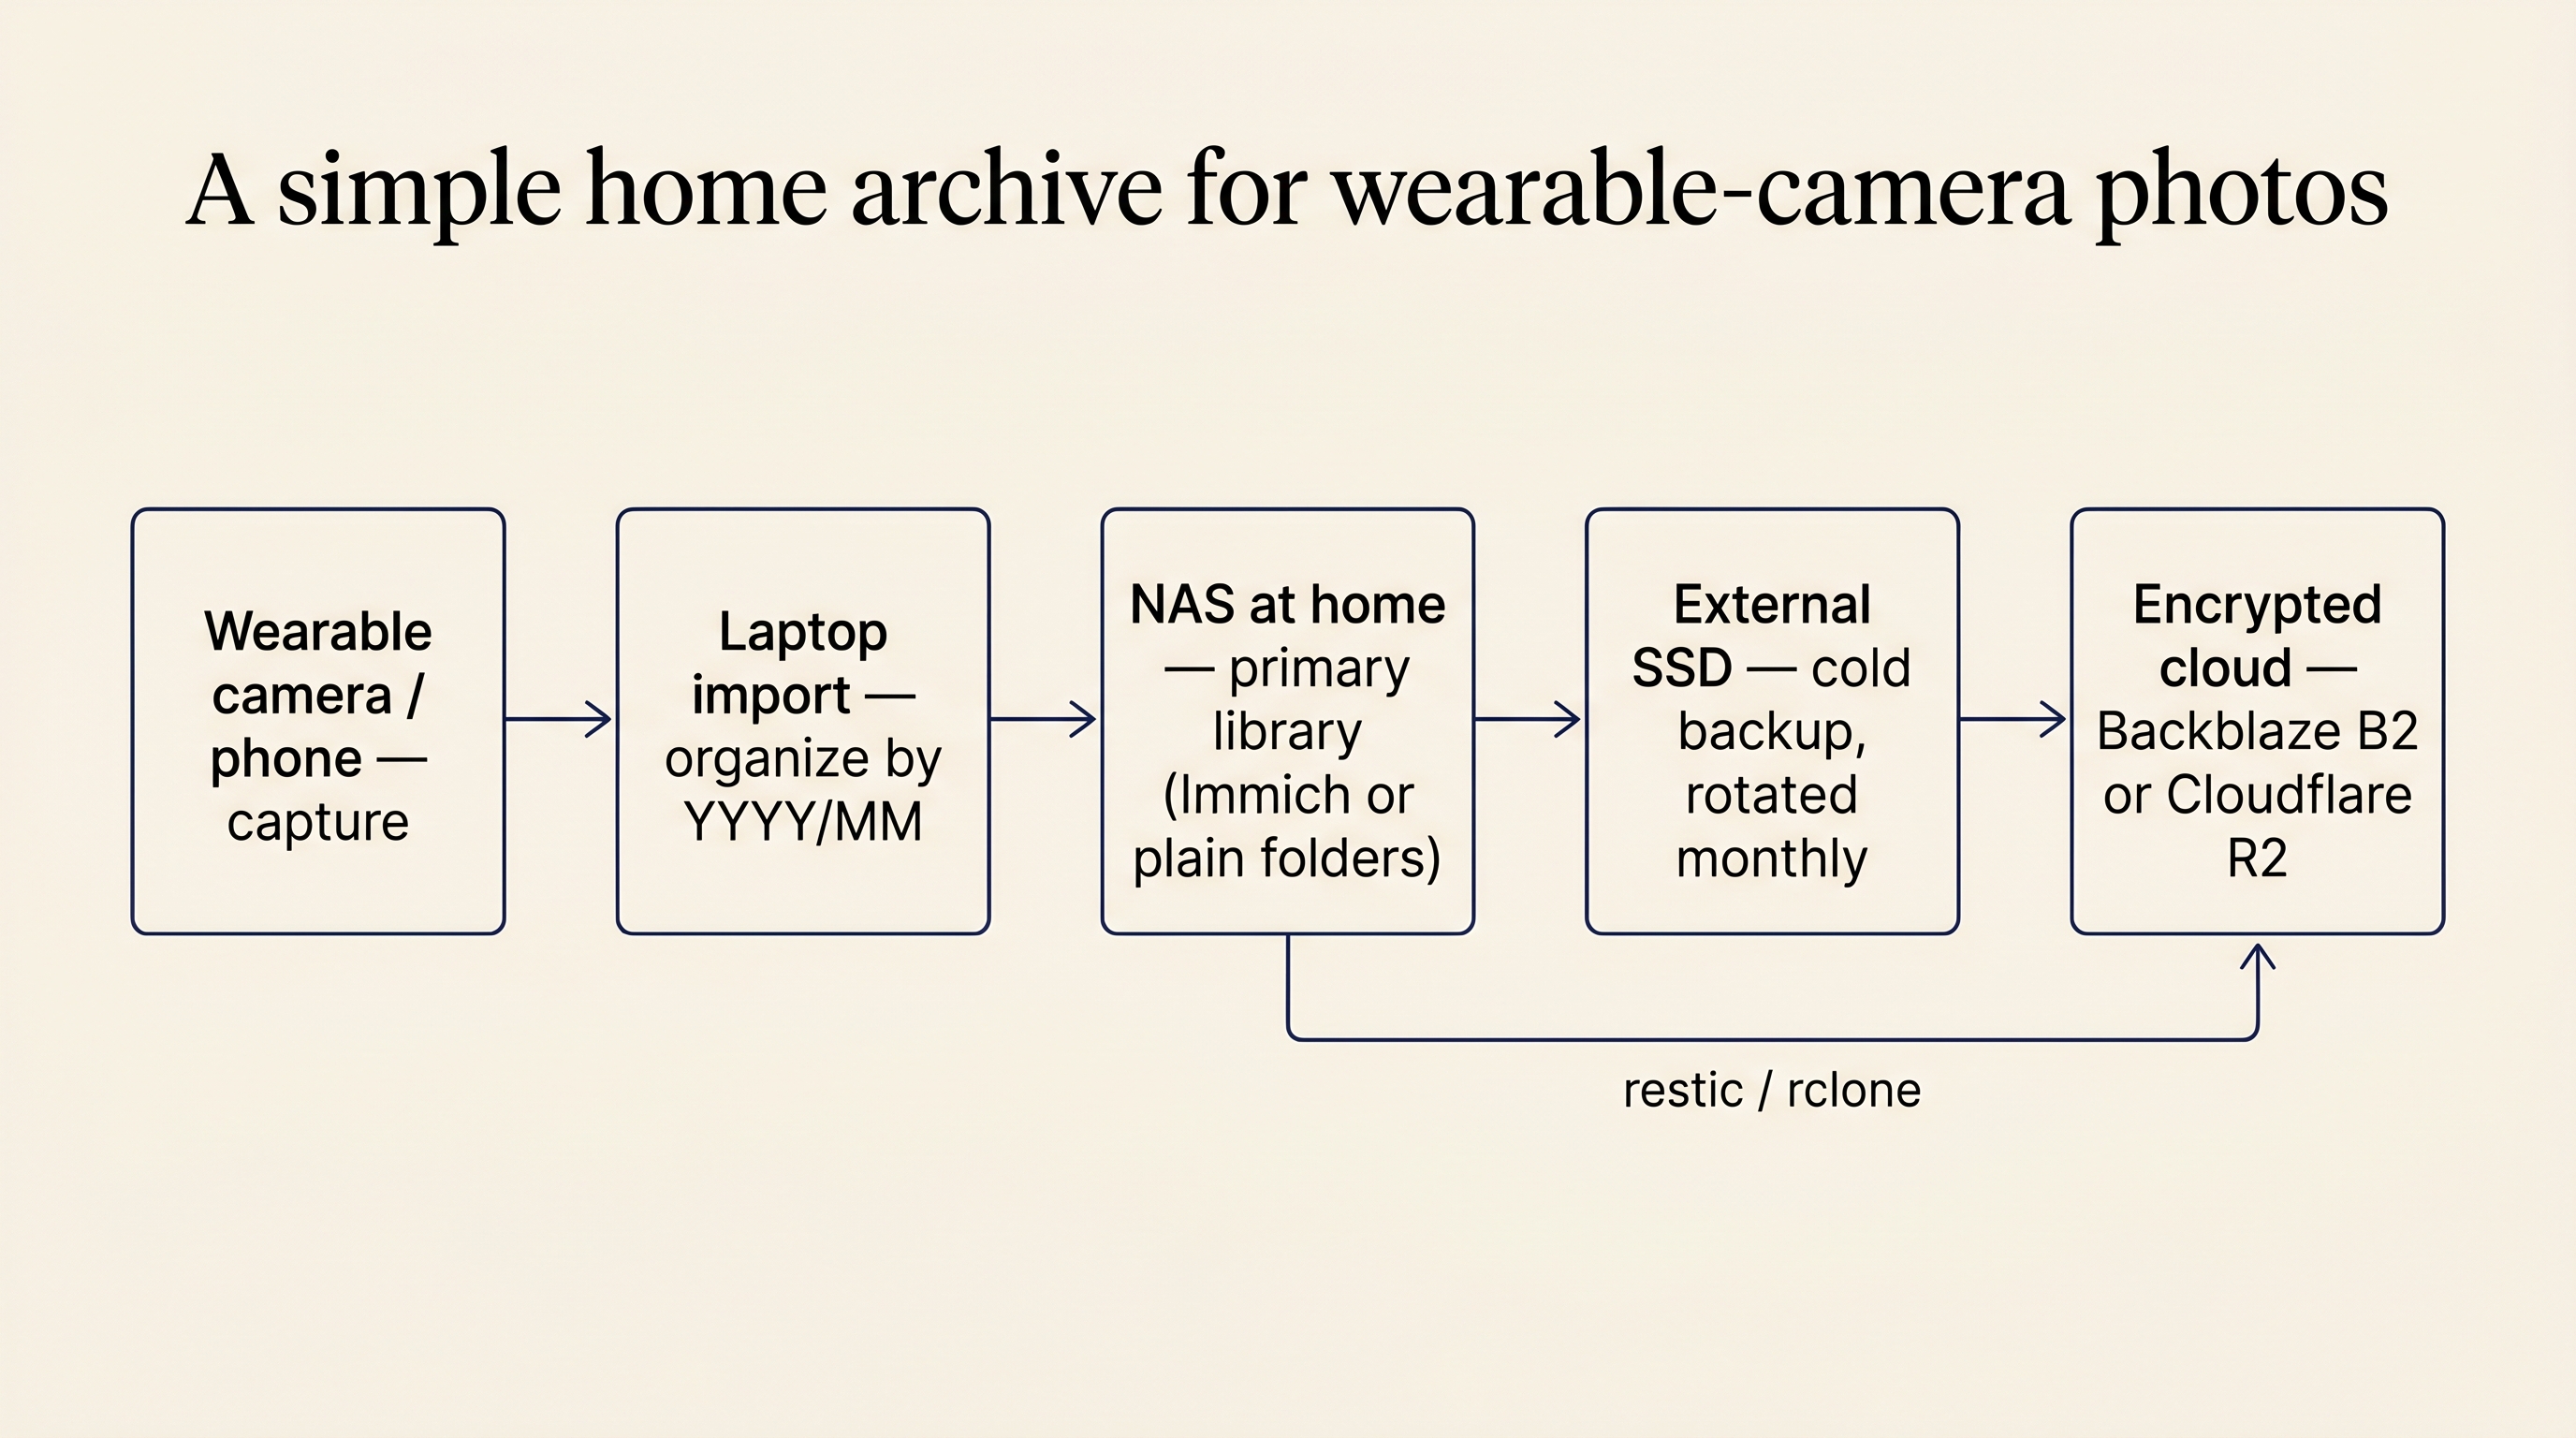
Summary. A home photo archive is the boring system that keeps a decade of pictures alive across vendor closures, drive deaths, and the slow accumulation of every wearable-camera frame you have ever shot. The goal here is one durable archive at home — a small NAS as the primary library, a portable SSD as the cold backup, and an encrypted cloud bucket as the off-site copy — built once, then maintained in fifteen minutes a month. Old Narrative Clip ZIPs from 2016 fold in cleanly. So do iPhone exports, Google Takeout dumps, and whatever the next camera generates. The point is the system, not any one device in it.
Before you start: take a real inventory
Almost everyone underestimates how scattered their photos are. Before you buy any hardware, spend an evening writing down every place pictures currently live. A practical list for a long-time lifelogger usually includes:
- An iPhone or Android phone with five to ten years of camera roll.
- iCloud Photos or Google Photos as the de facto cloud library.
- A 2016-era Narrative Clip export ZIP, possibly still in a Gmail attachment.
- Old SD cards in a shoebox from compact cameras and the original Clip dock.
- A Dropbox folder named something like
photos_old_phonethat nobody has opened since 2019. - A Google Takeout download that was started, never finished, and now lives in
~/Downloads. - Whatever the current wearable camera writes to — an Insta360 GO, a Frame, a Memoir, or whatever shipped this quarter.
Write it down. The inventory is the project. Once you can see every source on one page, the import order becomes obvious and the storage estimate becomes real.
While you are at it, decide on a single naming convention now, before any files move. The one we recommend is the one most cameras already produce: YYYY-MM-DD_HHMMSS_source-id.jpg. So 2026-05-11_073412_clip-12345.jpg. The date is sortable, the time disambiguates burst frames, and the source tag survives later re-uploads to apps that strip EXIF. If a photo is ever pulled out of context and dropped on a desktop, you can still tell what it is and when it was taken.
On duplicates: do not resolve them yet. Pictures coming from different sources often have different metadata — EXIF stripped here, GPS preserved there, the better resolution on one side and the better timestamp on the other. Deduping before import means choosing which version to lose. Wait until everything is in one place, then run PhotoSweeper on macOS or Czkawka on any platform, both of which compare visually and let you keep the version with the richer metadata. Pruning is the last step, not the first.
Step 1: the boring kit you actually need to buy
The hardware list for a home archive is shorter than the internet pretends. Five items cover almost every household.
Synology DS224+
The two-bay NAS most people should start with — quiet, low-power, and DSM is still the friendliest NAS OS.
Best for:A quiet two-bay NAS that runs Immich, Synology Photos, and Hyper Backup without asking you to learn Linux first.
Approx. price: $320— check current price at retailer
WD Red Plus 8 TB (CMR)
8 TBCMR (not SMR) NAS drive at the capacity most home archives are sized around — quiet, well-understood, easy to find.
Best for:One half of the mirrored pair — drives built for NAS duty cycles rather than desktop sleep cycles.
Approx. price: $180— check current price at retailer
Seagate IronWolf 8 TB
8 TBSeagate's NAS-tuned drive line, with onboard health telemetry — direct alternative to the WD Red Plus.
Best for:The other half of the mirror, intentionally a different brand so a single bad production batch cannot kill both drives.
Approx. price: $190— check current price at retailer
Samsung T9 portable SSD
2–4 TBFast USB-C portable SSD; quiet, pocketable, and a sensible target for monthly cold-backup rotations.
Best for:The cold backup leg — plug it into the NAS once a month, run Hyper Backup, and put it back in the drawer.
Approx. price: $220— check current price at retailer
APC Back-UPS BN650M1
Entry-level UPS that keeps a small NAS up through a power blip and signals a clean shutdown — boring, necessary, cheap.
Best for:A small UPS keeps the NAS alive through brownouts and shuts it down gracefully during longer outages, which matters more than people think.
Approx. price: $90— check current price at retailer
The mixed-brand drive pair is not paranoia. Drives from a single production run can fail in correlated ways, and a mirror does not help if both halves die in the same week. Pairing a WD Red Plus with a Seagate IronWolf at the same capacity is a small insurance policy that costs nothing extra.
If a NAS is overkill — small library, one person, technically uninterested — the budget alternative is a single large desktop drive used as a cold archive, plugged in once a month.
WD Elements 12 TB desktop HDD
12 TBCheap per-TB desktop USB drive; the pragmatic pick for an at-home cold archive copy you only plug in monthly.
Best for:Twelve terabytes of cold storage for under US$200 — the smallest viable home archive when a NAS feels like too much building.
Approx. price: $200— check current price at retailer
Step 2: the folder structure that survives every app
Apps come and go. The filesystem is forever. So before any photo moves, agree on a folder structure that does not care which app reads it.
The structure that works at scale is date-based:
archive/
  by-year/
    2016/
      2016-04/
        narrative-export/
        phone/
      2016-05/
        ...
    2024/
      2024-03/
        wearable/
        phone/
        video/
    2025/
      ...
    2026/
      2026-05/
        wearable/
        phone/
Date folders work because every photo has exactly one date. Event folders sound nice — birthday-2024/, tokyo-trip/ — until you realize the same trip overlaps a birthday and a work conference, and now the folder structure is a tagging problem in disguise. Tagging belongs in the photo app, where it can be many-to-many. The filesystem is where the canonical, single-truth location lives. One file, one path.
The wearable/, phone/, and video/ subfolders under each month are optional but worth it once you have multiple sources. Six months in, you will want to find every Insta360 GO frame from March without scrolling through 9,000 phone photos to do it.
Filenames preserve the camera-generated timestamp: 2026-05-11_073412_clip-12345.jpg. Most cameras already write something close to this. If yours does not, a one-line exiftool rename command standardizes a whole directory in seconds:
exiftool '-FileName<DateTimeOriginal' -d '%Y-%m-%d_%H%M%S_%%f.%%e' ./incomingThat single line saves you ten years of “why is this file called IMG_0001 (1) (1).jpg”.
Step 3: import the existing chaos
The hardest part of building a home archive is moving the old stuff in. Here is the sequence that minimizes pain.
Mount the NAS first. On macOS, connect via SMB to smb://your-nas.local/photo or install the Synology Drive client. On Windows, map a network drive. On Linux, mount the SMB share once and add it to /etc/fstab so it reattaches on boot. You want the NAS to feel like a local folder before you start dragging files.
Unpack the Narrative Clip ZIPs. Decompress each export into archive/by-year/2016/2016-XX/narrative-export/, where XX is whichever month the photos were taken — not the month you exported them. The JPEGs inside have valid EXIF timestamps, and most photo apps will read those when you point them at the folder later.
Handle Google Takeout with care. Google Takeout strips EXIF timestamps and writes them into per-photo JSON sidecar files. Naive imports break on this — every photo ends up timestamped “today” because that is when the file was created on disk. The fix is immich-go, a small command-line tool that rebuilds EXIF from the sidecars before import. Run it once on the unpacked Takeout folder, then move the result into your year-based tree.
For iCloud and Apple Photos: open the Photos app, select all, then File > Export > Export Unmodified Originals. Do not use Export (which re-encodes), do not screenshot. The Originals export preserves the actual files, including HEIC video sidecars for Live Photos. Move the result into the year tree.
Old SD cards last. Plug them in, copy off, label the folder with the source camera so you remember in five years. SD cards from a 2014 compact camera are a known surprise — the date on the card is sometimes the date the camera was last factory-reset, not the date the photo was taken. EXIF is more reliable.
Dedupe at the very end. Once everything is in archive/by-year/, run Czkawka or PhotoSweeper. Compare visually, not by hash, because the same photo from two sources will differ at the byte level. Keep the version with the richer metadata. Toss the rest.
Step 4: the app you actually open
The filesystem is the canonical archive. The app is how you live with it.
Immich is the realistic choice in 2026 if you want a self-hosted experience that feels like Google Photos. Install via Docker on the Synology — the project ships a docker-compose.yml that runs out of the box — and point it at the archive/by-year/ directory in read-only mode. Mobile apps for iOS and Android auto-upload new photos from your phone. Face grouping, semantic search, timeline view, shared albums — all the things that make a library feel alive rather than archived.
Two caveats. Immich is still pre-1.0 as of mid-2026, which means breaking changes happen. Pin the Docker image to a specific version tag, read the release notes before pulling a newer tag, and back up the Immich Postgres database. The original files are safe on the filesystem, but the face groupings and tags live in the database, and rebuilding them on a 200,000-photo library takes hours.
Synology Photos is the no-config fallback for households where one person is technical and the rest are not. It runs out of the box on the DS224+, has a clean iOS and Android app, and shows up as a folder in Synology Drive on every laptop. It does less than Immich — search is keyword-based, not semantic, and face grouping is functional rather than great — but it works on day one and never breaks on an update. For a parent or partner who just wants the photos to be findable, this is the right answer.
For deeper coverage of the app layer, see photo organization AI and personal archive tools. The short version: pick one, commit, stop comparison shopping.
Step 5: the cold backup leg
The NAS mirror protects you from one drive dying. It does not protect you from a rm -rf typed in the wrong window, from ransomware that walks the SMB share, or from a lightning strike that takes both drives at once. The cold backup is what handles all three.
The mechanism is boring on purpose. Once a month, plug the Samsung T9 into the back of the NAS. Open Hyper Backup. Run the existing backup task — set it up the first time and you never touch it again. When the green checkmark appears, eject the drive, unplug it, and put it back in the drawer.
That word, unplug, is the entire point. A drive that lives on the NAS 24/7 is a drive that ransomware can encrypt the next time something nasty walks in through a phishing email. A drive in a drawer is air-gapped. It is not network-reachable, it is not power-attached, and the worst it can do is sit there for thirty days waiting for the next backup. Cold storage is dumb storage. That is the feature.
Local backup checklist
A photo archive that lives only on a vendor's cloud is a photo archive waiting to disappear. Use the 3-2-1 rule: three copies, two media, one off-site.
- Copy 1: the original on your camera or phone (keep until backups are verified).
- Copy 2: an external SSD or hard drive plugged directly into your computer.
- Copy 3: an off-site copy — encrypted cloud, a NAS at a family member's house, or a drive in a desk drawer at work.
- Filenames keep the camera-generated timestamp (e.g.
2026-05-11_073412.jpg) so dates survive re-uploads. - One year from today, open a random folder and verify the files still open.
- Write the password for the encrypted copy on paper and store it where the executor of your estate can find it. People skip this. People also lose decades of photos.
For a longer walkthrough see how to back up lifelogging photos and local-first photo storage.
Step 6: the off-site leg
The drawer protects you from drive death, ransomware, and accidents. It does not protect you from a fire, a flood, or a burglary that takes the NAS and the SSD together. The off-site copy is one decision away from being a non-event.
There are three honest options for the cloud leg, each with a different trade-off.
Affiliate disclosure: This page contains affiliate links. If you buy or sign up through them, NarrativeClip may earn a commission at no extra cost to you. Our recommendations are editorially independent. Read more.
pCloud
Consumer cloudSwiss-based consumer cloud with a rare one-time-payment "lifetime" plan and an optional zero-knowledge encryption upgrade.
Best for:A sync-style locker that looks like Dropbox and treats your photo folder as a normal drive — easy to set up, easy to restore from, and lifetime plans exist if you hate monthly bills.
Photo-archive fit:Long-term archive of culled lifelogging photos and family video.
Backblaze
Cloud backup + object storageThe simplest "set it and forget it" computer backup, plus B2 — an S3-compatible object store priced for individuals.
Best for:The cheapest sensible option per terabyte — pair B2 with restic for client-side-encrypted snapshots and you get a versioned off-site copy the provider cannot read.
Photo-archive fit:Primary off-site copy for a 3-2-1 strategy; B2 for restic/rclone snapshots of NAS data.
Internxt
Encrypted consumer cloudOpen-source, post-quantum-leaning encrypted cloud built in Spain — for people whose first question about a cloud is "who can see this?".
Best for:End-to-end encryption by default, EU-based, and zero-knowledge — for households that want the off-site copy to be unreadable to the vendor without any setup work.
Photo-archive fit:Encrypted off-site copy of a culled photo archive, where the provider truly cannot see filenames.
The technically minded should pick Backblaze B2 with restic. The combination is roughly US$5 to US$6 per terabyte per month in 2026, restic handles deduplication and client-side encryption, and the snapshot model means an accidental delete in May is recoverable from the April snapshot. A year of typical wearable-camera output costs around US$50 stored encrypted.
The non-technical should pick pCloud and stop thinking about it. Lifetime plans exist, the interface is a folder, and restoring is a drag-and-drop. Internxt sits in the middle — sync-style ease with end-to-end encryption baked in.
Whichever you pick, the off-site leg should be automated. Hyper Backup pushes to pCloud or B2 on a schedule, restic runs from a cron job on the NAS, or rclone copies on a timer. The point is that you set it up once and the cloud copy keeps itself current without you remembering to do anything.
Step 7: verify, on a calendar
A backup you have never restored from is a hope. Hopes do not survive a real failure.
Once a quarter, block thirty minutes. Pick a random folder from the archive — archive/by-year/2024/2024-08/wearable/ is fine. Restore it to a temp location from the cold SSD. Open one file. Then restore the same folder from the cloud copy. Open another file. If anything fails — a missing key, a broken extraction tool, an expired credential, an unreadable container — fix it now, while the data is still elsewhere.
Quarterly is the right cadence because anything longer and the failure modes accumulate silently. We have seen restic repositories become unreadable after a year of unattended cloud snapshots because a tool was upgraded and the repository format changed without a clean migration. Annual verification would have missed it. Quarterly catches it before the data goes.
Step 8: maintain, on a schedule
The realistic time cost for this entire system, once it is running, is fifteen minutes a month for the cold SSD swap and thirty minutes a quarter for the restore test. That is the deal. Anything more frequent is theater; anything less and the discipline rots.
A workable annual rhythm:
- Monthly: plug the cold SSD into the NAS, run Hyper Backup, eject, put it away.
- Quarterly: run the restore test. Cull aggressively in one month of photos — drop the redundant burst sequences, the indistinct hallway shots, the blurry frames beyond rescue. A wearable camera produces enormous redundancy and editing is part of preservation, not opposed to it.
- Annually: rotate the password manager master password if you use one. Review the folder structure — most of it should not have changed, and any drift is a sign something is off. Replace any drive older than five years, regardless of SMART status. Open the paper letter with the recovery info and update anything that moved.
Once a year, on a date you remember, do all three at once. A birthday works. The point is calendar-driven habit, not heroic effort.
Specific advice for old Narrative Clip exports
If you are reading this with a folder full of ZIPs from Narrative’s 2016 export window, the import is the easy part. The Clip’s exports were well-behaved: clean JPEGs, EXIF timestamps intact, a folder structure that survives modern unzipping. Drop each ZIP into the right archive/by-year/YYYY/YYYY-MM/narrative-export/ folder based on when the photos were taken, not when the export ran. The 2016 export ran in late summer for most users, but the photos themselves span 2013 to 2016.
The EXIF dates inside Clip JPEGs are the date the photo was taken, not the date Narrative’s cloud processed it. Modern photo apps read these correctly. Once the folder is in Immich or Synology Photos, run face recognition on the whole set — the Clip’s 2-frame-per-minute cadence captured an enormous number of people who happened to walk into your field of view, and you will be surprised who shows up. Aunt you have not seen in eight years, a friend who moved abroad, a coworker from a job you forgot you had. The frames were not staged, which is the whole point.
We covered the cloud closure itself in the Narrative Clip cloud shutdown explainer. The short version is that the photos people downloaded before the lights went out in 2016 are still perfectly good JPEGs. The work now is folding them into a system that will not require another rescue in another ten years.
What can go wrong, and how to recover
Three boring failures account for almost every recovery scenario.
A drive in the mirror dies. Symptom: the NAS web UI shows a red status light, Synology sends an email. Replacement: order an identical-capacity drive (different brand if available), slide it into the empty bay, click “Repair” in Storage Manager. The NAS rebuilds the mirror in twelve to twenty-four hours depending on how full the volume is. Photos remain accessible the entire time. Cost: one drive, one evening of monitoring.
Ransomware encrypts the NAS share. Symptom: every file on the SMB share becomes *.encrypted overnight, a README_DECRYPT.txt appears in every folder, you swear. Recovery: power off the NAS. Reset it to factory defaults, reinstall DSM, restore the photo volume from the cold Samsung T9 (or the cloud snapshot, if the cold drive is also behind on backups). Replace whatever credentials or RDP exposure let the attacker in. Total downtime: a weekend. No ransom paid. The cold copy is the entire point.
The household reorganizes and the NAS lives somewhere with worse network. Symptom: the new “office” is now a closet under the stairs and the SMB share is unreachable from the kitchen iPad. Recovery: install Tailscale on the NAS and on every device. The NAS gets a stable Tailscale IP that works from any network, including phones on cellular. Suddenly the NAS is reachable from a hotel in another country, not just the couch. This is the upgrade most people end up doing eighteen months in. Worth doing earlier.
Related reading
- Best cloud storage for lifelogging — provider-by-provider breakdown of the off-site leg.
- NAS vs. cloud for photo archives — the longer argument for the primary tier.
- Best NAS for a photo archive — hardware comparison if the DS224+ does not fit.
- The 3-2-1 backup rule for lifelogging — the principle this whole system implements.
- Storage calculator for wearable cameras — sizing the NAS before you buy it.
- Local-first photo storage — why the master copy belongs on your hardware.
- How to back up lifelogging photos — the shorter, sub-six-minute version of this guide.
Frequently asked questions
How much will a basic home photo archive cost in 2026?
A two-bay Synology NAS with two 8 TB drives runs about US$900 with disks, a 4 TB Samsung T9 portable SSD adds around US$350, and a small APC UPS lands near US$90. Add roughly US$50 a year for an off-site cloud bucket. Most people building this for the first time spend between US$1,300 and US$1,500 up front, then under US$10 a month.
Do I really need a NAS, or is an external drive enough?
An external drive is enough if your library is under 4 TB and only one person uses it. A NAS earns its keep when you want phone uploads from several devices, a Google Photos-style app like Immich, or a single drive failure that does not cost you anything. If a Narrative Clip ZIP is the heaviest thing you own, start with the external drive and upgrade later.
Can I import an old Narrative Clip export ZIP into this archive?
Yes. Unzip the export into a dated folder under the right year, preserve the original filenames so EXIF timestamps survive, and include the folder in both the local and off-site backup paths. Once it sits in Immich or Synology Photos, face recognition will surface people you forgot the camera had even seen.
Will Immich lose my photos when it updates?
Not if you treat it like the pre-1.0 project it is. Pin the Docker image to a specific version, read the breaking-change notes before pulling a newer tag, and back up the Immich Postgres database alongside the photos. The photo files themselves live on disk as ordinary JPEGs and MP4s, so even a worst-case Immich corruption does not touch the originals.
How long does the monthly maintenance take?
About fifteen minutes if nothing has gone wrong, an hour if a drive is throwing SMART warnings. Plug the cold SSD into the NAS, run Hyper Backup, eject, and put it back in the drawer. Once a quarter, do the same and add a thirty-minute restore test. That is the entire discipline.
What is the single most important step people skip?
The restore test. A backup you have never restored from is a hope, not a backup. Schedule a quarterly half-hour where you pick a random folder, pull it back from the cold SSD or the cloud, and open one file. Failures are almost always boring — a missing key, a broken extraction tool, an expired credential — and you want to find them when you do not need the data back.